
Post #1 · Posted at 2013-01-05 01:19:40pm 13.4 years ago
I bought a used DDR machine (and I knew going in that it was a hacked machine and was fine with that as I probably would've done that anyway), but it turns out the seller decided to lie about the appearance of the machine they were selling and sent me a different looking one that was in much worse shape.
I'm still working on figuring out just how many of the pad sensors and pieces of neon work, but I know already that two of the wires on two of the sensors are shot and those need to be replaced. And there were another 5 sensors that were completely unplugged from the machine--one of which when plugged back in made only the neon on the player 1 and player 2 right arrow light up and no other neon would work.
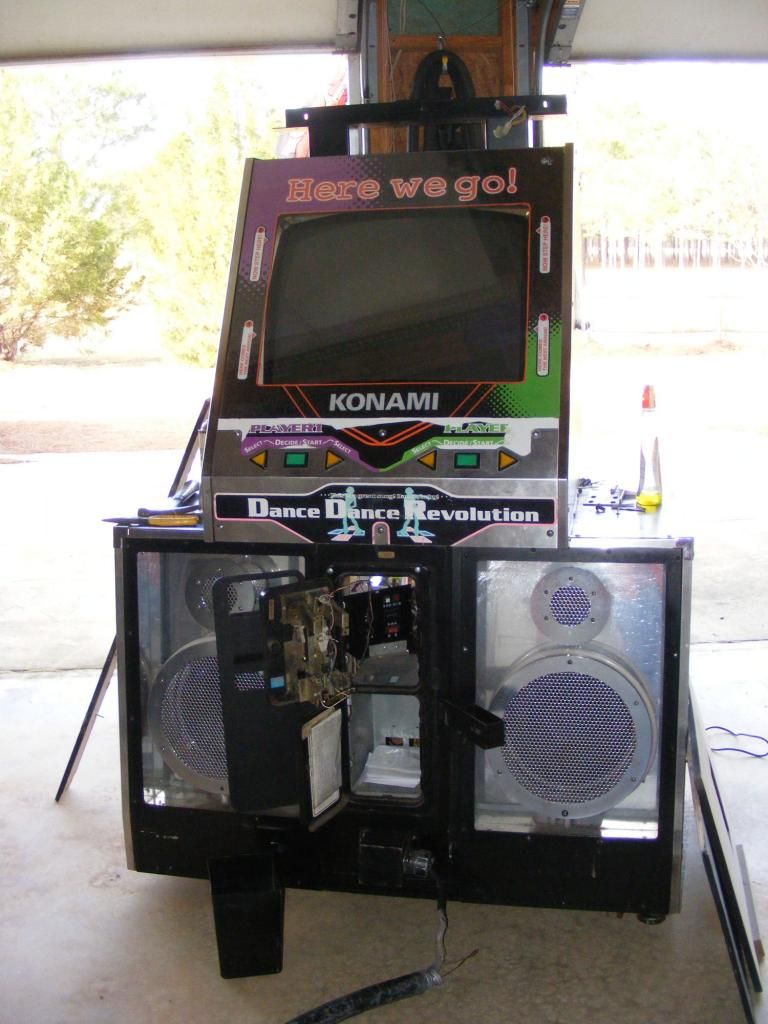
I might as well post some pictures of this machine. Perhaps someone can help identify what the heck is up with the machine or what was done to it. Clearly a lot has been changed/replaced/crapified.
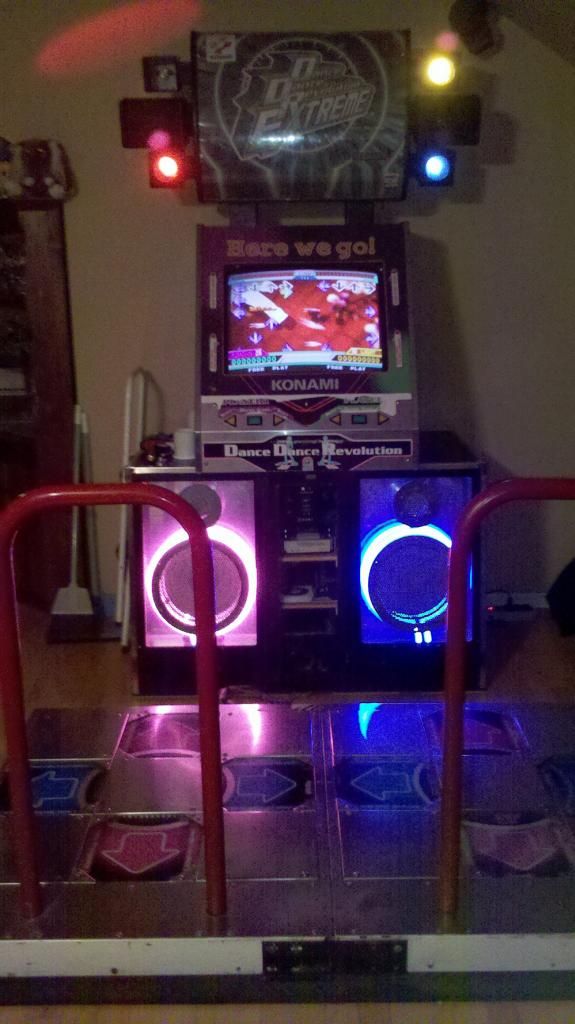
Front of the machine:
[There is a piece of glass there and the "Here we go!" part was printed somewhere, cut out, and stuck behind it.
When the machine is on, the left neon is pink, but the right one is blue.
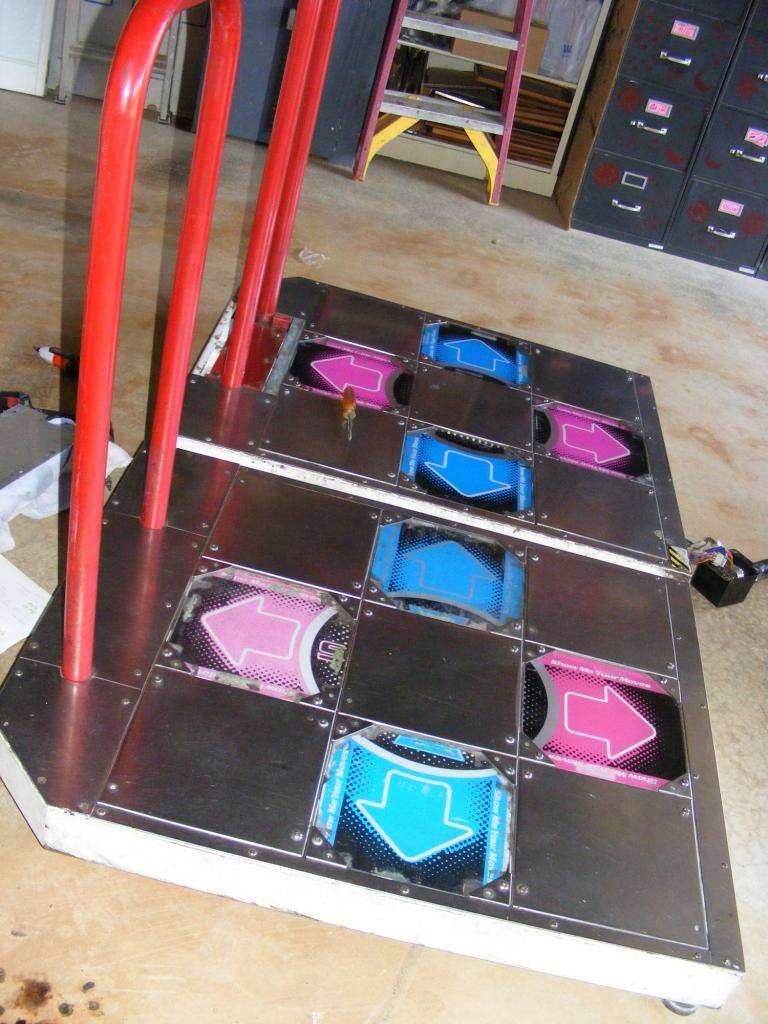
Pads:
[The player 1 side is in better shape overall than the player 2, but both have bad sensors and missing screws.]
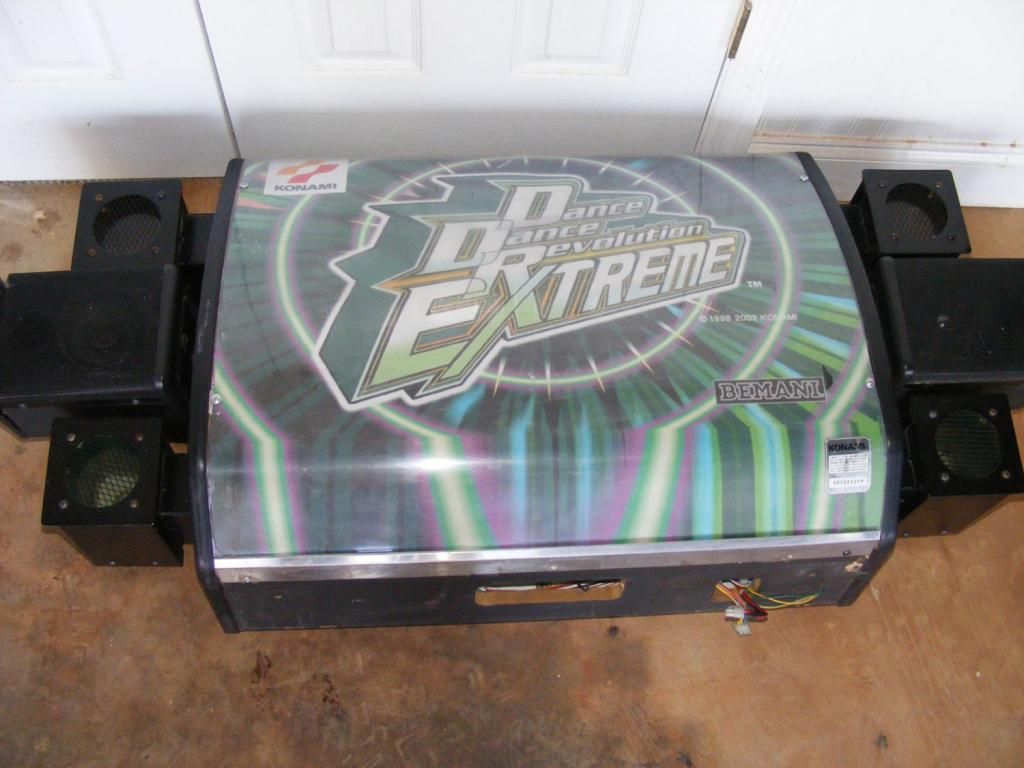
Marquee:
[The Extreme sign is pixelated when you get up close to it. Kinda low quality. Haven't hooked this part up yet, so not sure how it works.]
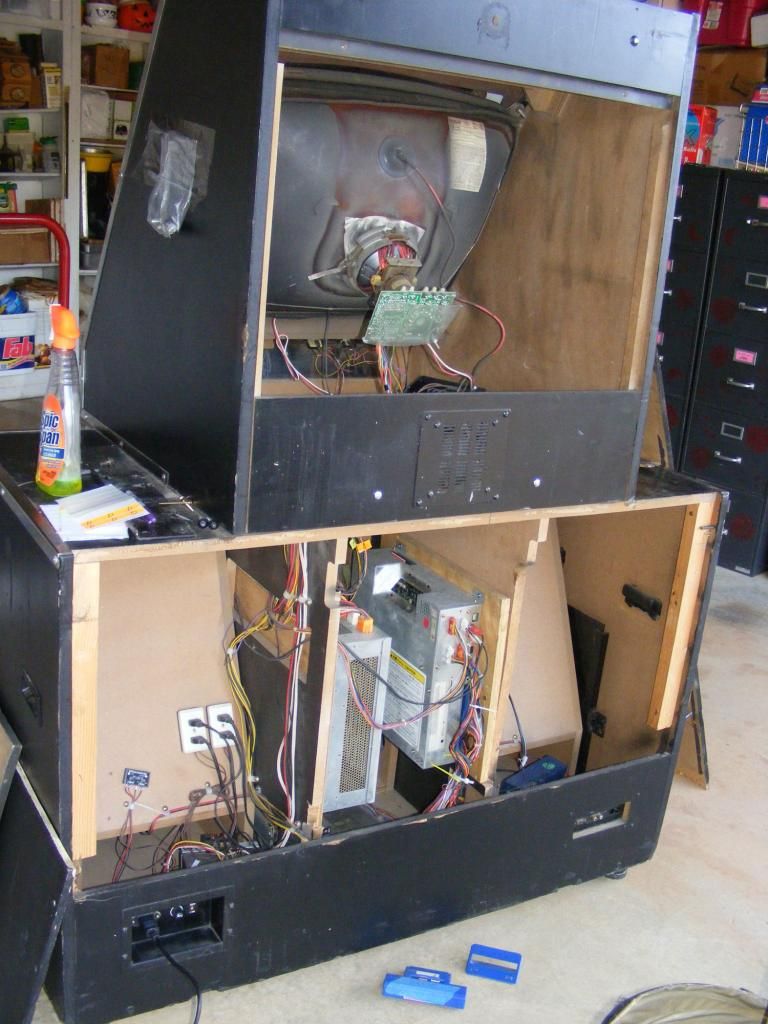
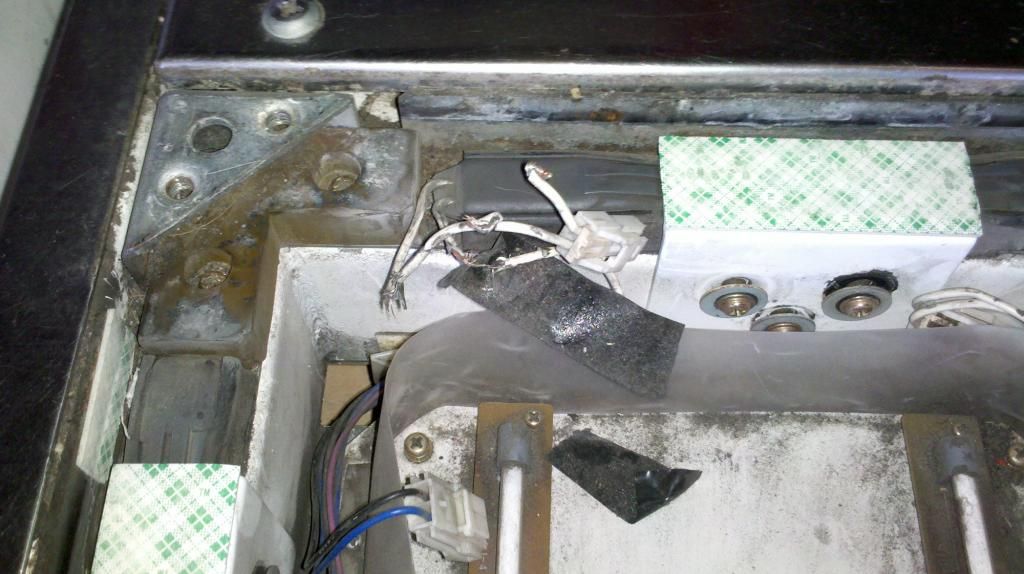
Back/Inside of cabinet:
[The TV doesn't seem to have a black bezel, so I assume it was replaced...?]

I'm still working on figuring out just how many of the pad sensors and pieces of neon work, but I know already that two of the wires on two of the sensors are shot and those need to be replaced. And there were another 5 sensors that were completely unplugged from the machine--one of which when plugged back in made only the neon on the player 1 and player 2 right arrow light up and no other neon would work.
I might as well post some pictures of this machine. Perhaps someone can help identify what the heck is up with the machine or what was done to it. Clearly a lot has been changed/replaced/crapified.
Front of the machine:
[There is a piece of glass there and the "Here we go!" part was printed somewhere, cut out, and stuck behind it.
When the machine is on, the left neon is pink, but the right one is blue.
Pads:
[The player 1 side is in better shape overall than the player 2, but both have bad sensors and missing screws.]
Marquee:
[The Extreme sign is pixelated when you get up close to it. Kinda low quality. Haven't hooked this part up yet, so not sure how it works.]
Back/Inside of cabinet:
[The TV doesn't seem to have a black bezel, so I assume it was replaced...?]
Post #2 · Posted at 2013-01-05 01:58:04pm 13.4 years ago
 Pikaboi Pikaboi | |
|---|---|
 |
Member |
| 53 Posts | |
 | |
| Reg. 2007-12-31 | |
The down arrow on the player 2 pad looks like it was stripped from an actual soft pad where it says, "Stay Cool!"
I'm not really a technical person, but I do wish you the best of luck bringing this poor baby back to life.
I'm not really a technical person, but I do wish you the best of luck bringing this poor baby back to life.
Post #3 · Posted at 2013-01-05 02:11:16pm 13.4 years ago
| bmhedgehog | |
|---|---|
 |
Banned+ |
| 3,136 Posts | |
| Not Set | |
| Reg. 2008-07-13 | |
| "BANNED" | |
Man, wtf did they do to this thing!? This definatly takes the meaning "buyer's remorse" to a whole new/another level.
Post #4 · Posted at 2013-01-05 02:18:52pm 13.4 years ago
Its a butchered Korean cab. Don't worry they were not the best quality to begin with. For starters The monitor is likely the original. The chassis for it usually sits on the side rather then on a metal plate under the monitor. Oh and they usually are pretty bad, and most of them are dying or are dead at this point due to numerous problems with them.
For the sensor lighting up the panel issue you/the previous owner might have crossed incorrect wires. As in the connector is supposed to be plugged in like this...
1/2->1/2
and it was plugged in like this...
2/1->1/2
Sometimes people will accidentally cross incorrect wires when using sensors not made for that games (ex. pump it up sensors). I don't know what damage it could have done. I have seen it happen before but it didn't end up hurting anything in the end, but I guess it could potentially ruin the pad I/O so I would check any panels you know that work first then doubles check everything is plugged in properly on problematic panels.
As for everything else, I wouldn't complain. You have a digital 573 with a flash card and a majority of the machine is there. Looks like a fun project and its something very doable unlike my ez2dj project which was a mystery. And ya, besides everything else, get new panel for the P2 side. It reeks of bad photoshop or idiot game tech. Almost anyone that looks at that machine could tell you something is wrong with those panels lol.
edit: and ya... the 573 and I also believe the amp is supposed to go down horizontally in the center not vertically attached to the side on Korean cabs. Whoever was the previous owner must have thought it was built incorrectly or something.
AS for the service box. Korean cabs used a horizontal loading coin mech (which is why the top of the service door was smaller then vertical loading Japanese cabs). Whatever arcade has it last ripped that one off put in new shelving and coin doors on which is why your service panel doesn't look like it fits. Again, not a super big deal, it won't affect how the machine plays or anything.

Post #5 · Posted at 2013-01-05 03:00:34pm 13.4 years ago
Thanks for the input and info, Kon. I'll definitely go over the pad with a fine tooth comb once I've managed to get the machine inside. (It's gotta go up stairs, so that was already something I was dreading...)
I posted another thread asking about where to get sticks/decals. Is CoinOpExpress my only option to get a set of those?
(In addition to pad sensors and the arrows, I also want to replace the monitor glass with a more authentic one. I'll deal with the marquee later, if needed.)
The machine actually arrived without a power cable (had to dig out a computer cable), but the machine's power outlet wouldn't power it on initially. Had to get my dad to break out a volt meter to figure out what was wrong...which turned out the machine's power plug was totally hooked up incorrectly and wasn't getting any power as a result. And on top of that, the connector that goes on the monitor had fallen off, which we discovered after another half an hour of wondering why there was power and no picture.
Here's a picture of the absolute worst of the sensors:
I posted another thread asking about where to get sticks/decals. Is CoinOpExpress my only option to get a set of those?
(In addition to pad sensors and the arrows, I also want to replace the monitor glass with a more authentic one. I'll deal with the marquee later, if needed.)
Quote: Pikaboi
The down arrow on the player 2 pad looks like it was stripped from an actual soft pad where it says, "Stay Cool!"
I'm not really a technical person, but I do wish you the best of luck bringing this poor baby back to life.
I'm not really a technical person, but I do wish you the best of luck bringing this poor baby back to life.
The machine actually arrived without a power cable (had to dig out a computer cable), but the machine's power outlet wouldn't power it on initially. Had to get my dad to break out a volt meter to figure out what was wrong...which turned out the machine's power plug was totally hooked up incorrectly and wasn't getting any power as a result. And on top of that, the connector that goes on the monitor had fallen off, which we discovered after another half an hour of wondering why there was power and no picture.
Here's a picture of the absolute worst of the sensors:
Post #6 · Posted at 2013-01-05 04:15:13pm 13.4 years ago
| Kon | |
|---|---|
 |
Member |
| 1,289 Posts | |
| | |
| Reg. 2007-07-02 | |
| "OMG KON!" | |
Some parts you can get here:
http://www.arcadespareparts.com/arcade_parts/dance_dance_revolution_parts.html
You can ask Betson for stickers and other stuff. Sometimes they have them sometimes they don't. CoinOpExpress might be the only other place besides channelbeat that may have stickers on hand that I can think of.
As for your sensors, they might still work. ^That usually happens when someone doesn't tuck the wiring down after installing a sensor. Some solder and electric tape will come in handy and that sensor might still function perfectly.
Post #7 · Posted at 2013-01-05 07:34:23pm 13.4 years ago
| Tyma | |
|---|---|
 |
Member |
| 2,309 Posts | |
| Not Set | |
| Reg. 2006-05-31 | |
 | |
I wouldn't get yourself too down about it. As Kon said, it'll turn into a nice project, and whatever machine you received would have been in "less than pristine" condition anyway. If you put time, money and love into it, then it has the potential to look as good as anyone else's machine.
When you buy any arcade machine, what you're paying for is the physical casing that holds a game - the MDF box, the welded metal pads, and lights and speakers, and the complicated wiring schematic - those are all things nobody can build themselves, and the only things wrong with your machine are either weird cosmetic changes, and wiring jobs that are probably within your means?
Any idea what you ultimately want to do with it yet?
Post #8 · Posted at 2013-01-06 01:49:36pm 13.4 years ago
Thanks for all the info and support, everyone.
We spent today getting the unit inside and hooked up. At this point, I know the machine needs...
- about 44 screws for the floor clips (among others, but some aren't as important as those),
- a new light bulb for the top light,
- florescent lights for the marquee,
- a bulb for the 2nd player green button,
- at least 3 floor sensors to replace bad or iffy ones,
- an extra pink strip of neon under one of the arrows as there's only 1 instead of 2 (will probably ignore this),
- new stickers for the machine,
- a more authentic "Here we go!" around the screen,
- 3 new arrows for the player 2 side,
- a more authentic "DDR Extreme" marquee picture (will probably ignore for now).
Modifications we made:
- The wheels and stabilizers on the DDR pads and machine were largely broken or bent, so we just took them all off. The DDR pads are on top of a thud rug (a heavy rubber weight lifting mat, they're not moving). The unit itself is on floor sliders.
- Put colored discs in the top lights since they were coming off as pure white.
- Since the machine is going to be a freeplay machine anyway, we went ahead and just totally removed the coin box. We moved the operator switch to the front (top left where the coin box was) so it could be easily accessed, and we added two little shelves into it. Since I needed to be able to easily access the CD-Rom drive without moving the entire machine, I relocated that to the front of the machine. We're going to add a custom door in the next day or so.
- The pad connector cord tube was shot, so we've just taken the cords completely out. We drilled a hold in the bottom of the machine (it already had one, so why not another?) and just fed the wires down through that. Going to cover the cords with something so they're not left exposed.
Post #9 · Posted at 2013-01-06 02:18:58pm 13.4 years ago
| AeronPeryton | |
|---|---|
 |
Member+ |
| 4,338 Posts | |
 | |
| Reg. 2007-03-03 | |
| "Give me a steady beat." | |
Looks like you're off to a great start. Good job making the most of it.
Post #10 · Posted at 2013-01-06 03:01:15pm 13.4 years ago
| Kon | |
|---|---|
|
Member |
| 1,289 Posts | |
| | |
| Reg. 2007-07-02 | |
| "OMG KON!" | |
Not all bad. Bulbs are easy, you should be able to find most of those at a hardware store. As for the marquee, snag a legit one on ebay. There is usually a ton of MAX, 4th Mix and 3rd Mix ones for sale and not badly priced. Panels can be found at the link from my previous post. Seriously the best place to buy for any parts you need. Definitely the most reliable, friendly, helpful and fast.
Post #11 · Posted at 2013-01-07 06:09:04am 13.4 years ago
Question: Where would you guys recommend buying extra 6mm x 10mm screws for the dance pad from?
I need to replace missing ones and others that are stripped.
[update: was finally able to find them on Betson.com: http://www.betson.com/products/amusement/KON-TRUSS%20SCREW
They look to be m6x10 truss head Philips screws.]
I need to replace missing ones and others that are stripped.
[update: was finally able to find them on Betson.com: http://www.betson.com/products/amusement/KON-TRUSS%20SCREW
They look to be m6x10 truss head Philips screws.]
Post #12 · Posted at 2013-01-08 06:36:29pm 13.4 years ago


For the pads, get to a Screwfix or some other hardware shop and get either some PIU style ones or hex drive button screws, both of which work really well 
APPEND - That cabinet looks like its got potential as well
I'd say for any sensors with frayed wires, if they are otherwise still good I'd say resolder and individually heatshrink each wire. Saves shelling out for new ones
APPEND - That cabinet looks like its got potential as well
I'd say for any sensors with frayed wires, if they are otherwise still good I'd say resolder and individually heatshrink each wire. Saves shelling out for new ones

Post #13 · Posted at 2013-01-08 11:36:38pm 13.4 years ago
Countersink your pad. http://www.fastenal.com/web/products/detail.ex?sku=XM2550012A20000 (they look long in the picture but they're not, they're the right size, these are what I bought) it makes the pad a million times better to play on. You'll need a countersinking bit and a drill. There are tutorials but seriously it's easy.
My machine was in similar shape to yours. After lots of work my pad is the best pad I've ever played on. I did A LOT of modding, however. Countersunk brackets, bought new spacers (mine were missing, I'll give you a link to what I bought as well for that just incase.) Threadlock (Blue) the sensor bracket screws so they don't come out, duct tape mod, and panel raise (flat pad.) Lots of work but it's worth it.
Spacers http://www.fastenal.com/web/products/detail.ex?sku=0145725 Again the picture is inaccurate, these are the correct size for your sensor brackets if they're missing.
As for missing screws inside the pad (I'm not 100% sure off the top of my head) but I'm fairly certain they're M4 I eyeballed the length, and if you get some small washers (to hold on the larger washer) it works just like the rimmed screws in the pad.
I don't know how much you know about pad modding so if you have any questions about any of these mods just ask. I'll try to keep checking this page (I usually only check it like once or twice a month.)
Post #14 · Posted at 2013-01-09 03:58:26am 13.4 years ago
| aoiddr | |
|---|---|
 |
Member |
| 11 Posts | |
| | |
| Reg. 2012-12-17 | |
Xiga, lots of good info there. Not sure I'll go for countersunk brackets just yet, but I'll definitely keep that in mind for down the road.
I did have a one question:
- What's the duct tape mod?
I've been putting business cards under/over certain problem sensors and moving bad ones to the sides of the pad until I can get some new ones. My pad also came with office supply store foam strips already put on the L brackets, so I assume that's what you mean by raising the pad up (to make it more sensitive).
Post #15 · Posted at 2013-01-09 04:31:01am 13.4 years ago
| xiga | |
|---|---|
| Member | |
| 19 Posts | |
| | |
| Reg. 2012-10-24 | |
Duct tape mod is different than the buisness card mod. I do use the business card mod as well as duct tape mod. (I'll explain better with my pictures.) Duct tape mod is placing layers of duct tape on top of the sensor bracket to raise the panel as high as it can be, increasing sensitivity overall by reducing the pressure needed to trigger the sensor. I'll try to take some pictures tonight of everything I've done, if you have any questions about anything just ask I'll help you out. Check again some time tonight and I should have some pictures up.
Post #16 · Posted at 2013-01-09 04:38:30am 13.4 years ago
| Kon | |
|---|---|
|
Member |
| 1,289 Posts | |
| | |
| Reg. 2007-07-02 | |
| "OMG KON!" | |
This is what I did to my pads
http://youtu.be/dJqKq_CMR0o?t=5m18s
Any more raising and the sensors get held down. Yours might be more wore down then mine so you may need more layers of cards, but that is typically as much as I have put into pads on any machine.
http://youtu.be/dJqKq_CMR0o?t=5m18s
Any more raising and the sensors get held down. Yours might be more wore down then mine so you may need more layers of cards, but that is typically as much as I have put into pads on any machine.
Post #17 · Posted at 2013-01-09 04:52:26am 13.4 years ago
Here is a picture from facebook I posted recently so you can see what I mean by "flat pad"

These were my "test panels" I haven't started on my nice panels yet. Doing those this week. I wanted to make sure I liked this mod first. I do. It's amazingly awesome.
If you look at the other side of the pad you can see how much lower the panels are in comparison. I actually play on the left side only modded the right out of convenince in the room and my wife was getting upset I was doing all the upgrades on "my side" of the pad first so I figured I'd test this out on her side.
Mod originally posted by B1uEM4oM4o on AIJ. Fairly new I guess. I thought it looked good and I play a lot of stamina stuff on ITG so i thought it may help.
Quote: Kon
This is what I did to my pads
http://youtu.be/dJqKq_CMR0o?t=5m18s
Any more raising and the sensors get held down. Yours might be more wore down then mine so you may need more layers of cards, but that is typically as much as I have put into pads on any machine.
I'm not sure if you were talking to me, but my pad I have a foam pad and 3-4 layers of duct tape on top. (I was going to explain this with the pictures.) I have a few brand new sensors which are on the inner most of all my panels, those generally have 1-2 extra piece of duct tape (this is pre-panel raising.) Two or three layers for the older senors with a business card underneth. If the arrow was triggering when I put the panel back on I'd step on the panel and try to depress the foam. if it stopped it was good, if not I would remove a layer of duct tape and try again. I would systematically try to figure out which sensor was being triggered and only remove tape from that one. My panels you can barely press and they register, but they're not TOO sensitive where they faulse register.http://youtu.be/dJqKq_CMR0o?t=5m18s
Any more raising and the sensors get held down. Yours might be more wore down then mine so you may need more layers of cards, but that is typically as much as I have put into pads on any machine.
Post #18 · Posted at 2013-01-09 05:17:09am 13.4 years ago
| Kon | |
|---|---|
|
Member |
| 1,289 Posts | |
| | |
| Reg. 2007-07-02 | |
| "OMG KON!" | |
Quote: xiga
Quote: Kon
This is what I did to my pads
http://youtu.be/dJqKq_CMR0o?t=5m18s
Any more raising and the sensors get held down. Yours might be more wore down then mine so you may need more layers of cards, but that is typically as much as I have put into pads on any machine.
I'm not sure if you were talking to me, but my pad I have a foam pad and 3-4 layers of duct tape on top. (I was going to explain this with the pictures.) I have a few brand new sensors which are on the inner most of all my panels, those generally have 1-2 extra piece of duct tape (this is pre-panel raising.) Two or three layers for the older senors with a business card underneth. If the arrow was triggering when I put the panel back on I'd step on the panel and try to depress the foam. if it stopped it was good, if not I would remove a layer of duct tape and try again. I would systematically try to figure out which sensor was being triggered and only remove tape from that one. My panels you can barely press and they register, but they're not TOO sensitive where they faulse register.http://youtu.be/dJqKq_CMR0o?t=5m18s
Any more raising and the sensors get held down. Yours might be more wore down then mine so you may need more layers of cards, but that is typically as much as I have put into pads on any machine.
Post #19 · Posted at 2013-01-09 08:28:23am 13.4 years ago
Quote: Kon
Quote: xiga
Quote: Kon
This is what I did to my pads
http://youtu.be/dJqKq_CMR0o?t=5m18s
Any more raising and the sensors get held down. Yours might be more wore down then mine so you may need more layers of cards, but that is typically as much as I have put into pads on any machine.
I'm not sure if you were talking to me, but my pad I have a foam pad and 3-4 layers of duct tape on top. (I was going to explain this with the pictures.) I have a few brand new sensors which are on the inner most of all my panels, those generally have 1-2 extra piece of duct tape (this is pre-panel raising.) Two or three layers for the older senors with a business card underneth. If the arrow was triggering when I put the panel back on I'd step on the panel and try to depress the foam. if it stopped it was good, if not I would remove a layer of duct tape and try again. I would systematically try to figure out which sensor was being triggered and only remove tape from that one. My panels you can barely press and they register, but they're not TOO sensitive where they faulse register.http://youtu.be/dJqKq_CMR0o?t=5m18s
Any more raising and the sensors get held down. Yours might be more wore down then mine so you may need more layers of cards, but that is typically as much as I have put into pads on any machine.
It's hard to really see in this picture I'll try to get a better but that side is literally completely flat. Pics in a little bit.
This is my makeshift rimmed L-Bracket screw with the spacers I linked to you.


Duct tape mod (with foam) Some people don't use a layer of foam, I do because it's compressable and if it triggers when you tighten the brackets you may be able to compress it enough to make it stop triggering.

Panel raise mod.


This is what I used.

This bit was ONLY used for smoothing out the cut. I used the "tile cutting kit" in the picture above to make the initial cut.

8 pieces (per side) of duct tape on top of what was already on the L-brackets.

Post #20 · Posted at 2013-01-09 12:36:25pm 13.4 years ago
| Kon | |
|---|---|
|
Member |
| 1,289 Posts | |
| | |
| Reg. 2007-07-02 | |
| "OMG KON!" | |
See if I was running in the groove I would probably do something like that but for DDR I am fine with the pads still being a little sunk down. My machine still beats the hell out of every other machine I have played on in the area, and if people were to honestly say they would come play on my machine more with that mod I would, but very few people make the trip out to the arcade where my machine is to go play every month.